
YouTube End Screens: Complete Guide to Adding, Designing, and Getting More Clicks (2026)
Quick Answer: A YouTube end screen is an interactive overlay you add to the last 5 to 20 seconds of a video. It lets you promote another video, a playlist, or your channel to keep viewers watching. You add it through YouTube Studio’s video editor. Each video can include up to four elements.
End screens are one of the highest-leverage tools in YouTube Studio, and most creators set them up badly or set them up once and forget. This guide walks through exactly how to add an end screen, which elements to choose, why “Best for viewer” usually beats “Newest upload,” and how to read the analytics that tell you whether your end screen is doing real work for your channel.
If you care about YouTube SEO optimization and want every video to feed the next one, end screens are the cheapest growth lever you have. Let’s get into it.
What Is a YouTube End Screen?
A YouTube end screen is an interactive overlay that appears during the final 5 to 20 seconds of your video. It can promote up to four clickable elements: a specific video, a playlist, a subscribe button, another channel, or an external link if you are in the YouTube Partner Program.
You will hear them called two different things: end screens and end cards. They are the same feature. YouTube’s official documentation uses “end screen,” but most creators use “end card” in casual conversation. Both terms refer to the same overlay system.
End screens replaced YouTube’s old video annotations feature in May 2017. Annotations did not work on mobile, and once mobile passed 70% of YouTube watch time, the company retired them. End screens were built to work across desktop, mobile, smart TVs, and game consoles. That single shift in delivery is the reason they exist today.
Why do they matter? Because every time a viewer clicks an end screen element and watches another one of your videos, YouTube counts that as a continued watch session. Session continuation is a strong channel authority signal in the recommendation algorithm. Your end screen is not just a courtesy CTA. It is one of the few places where you get to influence what YouTube counts as a successful viewing session on your channel.
YouTube End Screen Requirements
Before you can add an end screen to a video, your video and your channel both have to meet a small set of requirements.
- Video length: The video must be at least 25 seconds long. Anything shorter cannot host an end screen.
- Channel standing: Your channel must be in good standing with no active Community Guidelines strikes.
- External link element: The “link” element type, which sends viewers to a website outside YouTube, requires YouTube Partner Program membership. All other element types are available to every creator.
- Element cap: Maximum of four end screen elements per video.
- Made for Kids restriction: Videos set as “Made for Kids” cannot use end screens. This is a policy YouTube enforces under COPPA compliance.
If your video is shorter than 25 seconds, you have two options: extend the video, or use YouTube Cards as a mid-video CTA instead. We cover the difference between Cards and end screens further down.
YouTube End Screen Element Types
You have six element types to choose from, and the difference between them matters more than most creators realize. The element you pick determines what YouTube serves the viewer next, which directly affects whether they keep watching your channel or click away.
| Element | What It Promotes | When to Use It | Notes |
|---|---|---|---|
| Video (specific) | A chosen video | For evergreen content you want to keep growing | Highest control over what the viewer sees next |
| Best for viewer | Auto-selected by YouTube | For diverse-content channels | YouTube picks based on viewer history; often the highest CTR |
| Newest upload | Your most recent video | For consistent-format channels where every video is relevant to every subscriber | Can underperform if your newest video is not relevant to the current viewer |
| Playlist | A playlist | For series or themed collections | Great for binge-worthy content; drives multiple video views per click |
| Subscribe | Your own channel | Always include one | Reserve one slot; place it away from video thumbnails for higher clicks |
| Channel | Another creator’s channel | Collaborations, cross-promo | Rarely used solo; combine with a video or playlist element |
The “Best for viewer” option is the most underused element on YouTube. We will explain why in the strategy section below.
How to Add an End Screen to a YouTube Video (Desktop, Step-by-Step)
Here is the exact desktop workflow. The whole process takes about three minutes once you know where everything is.
- Go to studio.youtube.com and sign in to your channel.
- Click Content in the left sidebar, then click the title or thumbnail of the video you want to edit.
- In the video editor that opens, click End screen in the top navigation bar.
- Click Add element in the upper-left area and choose your element type from the dropdown (Video, Playlist, Subscribe, Channel, or Link).
- Drag elements around the preview to position them, then click and drag the timeline marker at the bottom to set when the end screen starts. The valid window is 5 to 20 seconds before the video ends.
- Click Save in the upper-right corner.
One tip that saves a lot of time: in the end screen editor, click Import from video at the top of the screen. This lets you pull the end screen layout from any other video on your channel. If you have a consistent end screen template, you can apply it to a new video in two clicks instead of building it from scratch every time.
YouTube also provides ready-made templates inside the editor (look for the “Apply template” option). These templates handle the layout and element positioning for you, but you still need to pick which video, playlist, or channel each slot points to.
How to Add an End Screen on Mobile
Mobile end screen editing works through the YouTube Studio app, not the main YouTube app. Here is the flow:
- Open the YouTube Studio mobile app and sign in.
- Tap the Content tab at the bottom of the screen.
- Tap the thumbnail of the video you want to edit, then tap the pencil Edit icon.
- Tap End screen in the editor.
- Tap Add element, pick your element type, position it on the preview, and set the timing.
- Tap Save.
The mobile Studio app has fewer customization options than the desktop version. You can add and position elements, but complex multi-element layouts are easier to build on desktop first. If you publish on mobile and want a polished end screen, we suggest doing the initial end screen setup on desktop, then using mobile only for quick edits later.
YouTube End Screen Element Strategy: Getting More Clicks
This is the section that separates creators who use end screens as decoration from creators who use them as a growth tool. The mechanics of adding an end screen are easy. The strategic choices are what move the numbers.
“Best for Viewer” vs “Newest Upload” vs Manual Selection
Most creators default to either “Newest upload” or a manually chosen video. Both can be the wrong call.
“Best for viewer” lets YouTube pick whichever of your videos that specific viewer is most likely to watch and complete. The algorithm uses signals like the viewer’s watch history, the videos they have liked, and which of your videos they have not yet seen. For channels with diverse content, this usually outperforms “Newest upload” because YouTube is matching the viewer to the right video for them, not pushing one video to everyone.
Here is the part most creators miss. When a viewer clicks your end screen and finishes the next video, YouTube counts that as a continued watch session. Session length is a channel-level ranking signal. Promoting a video that a viewer is statistically likely to complete generates more session time than promoting your newest video, which they may or may not watch through.
When does manual selection beat “Best for viewer”? When you have a specific funnel in mind. If your video is “How to set up a YouTube channel” and you have a follow-up called “How to optimize your first YouTube video,” manual selection routes the viewer through your intended path. The algorithm does not know about your funnel; you do.
Our default suggestion: use one “Best for viewer” element and one manual video element on most uploads. That combination gives the algorithm room to surface the best match while still letting you steer toward a specific next video.
Session Time Is the Real SEO Metric
YouTube does not just care about views. It cares about how long a viewer stays inside YouTube after watching your video. If your end screen click leads to a completed view of the next video, that is a continued watch session, and continued sessions are how channels build authority in the recommendation system.
The practical takeaway: promote your highest-retention video, not necessarily your newest. Pull up the Audience Retention report in YouTube Studio (Analytics > Engagement > Audience retention), identify which of your videos have the strongest average percentage viewed, and promote one of those on your end screen. A video that holds 60% retention will generate more session time per click than a video at 35% retention, even if both rank similarly on click-through rate.
This is the same principle that drives strong video titles: every signal you give the algorithm should point toward more viewer time on your channel, not just more clicks.
Subscribe Button Placement
The subscribe element is the one element you should include on every video. It is also the one most creators position badly.
Place the subscribe element away from your video thumbnail elements. If a viewer is hovering over a video thumbnail to read the title, you do not want your subscribe button under their cursor competing for the click. The bottom-right corner is a strong default position because it is the natural place a viewer’s eye lands after reading the rest of the end screen.
Also: do not stretch a video thumbnail across the subscribe button. End screen elements have hit zones, and overlapping zones can confuse where a click registers.
Two or Three Elements Outperforms Four
You can add up to four end screen elements. You usually should not. Element clutter reduces the click-through rate on each individual element because you are dividing viewer attention across more options.
A clean two-element layout (one video and one subscribe button) consistently produces higher per-element CTR than a four-element layout. If you have a specific reason to use three elements (a video plus a playlist plus a subscribe button, for example), that works too. Maxing out at four elements is usually a sign that the creator does not know which video to prioritize, and the analytics will reflect that hesitation.
The Zombie End Screen Problem
Here is an issue almost no other guide talks about. Once a creator sets an end screen, they rarely update it. Months later, the end screen is still promoting a video that is six months old, has declining retention, and is no longer a strong next-click for the viewer.
When you promote a stale video with low recent retention, two things happen. First, the click-through rate on that end screen element drops because viewers can tell from the thumbnail or title that the video feels old. Second, even when viewers do click, they bounce faster because the video no longer holds attention the way it once did. Both of those hurt your session signals.
We suggest reviewing your top 10 videos by traffic every 30 to 60 days. If a video is still pulling significant watch time but its end screen is pointing at something stale, swap the promoted video for one that is currently performing well. This is the lowest-effort, highest-return maintenance task in your YouTube workflow.
YouTube End Screen Timing Strategy
You can start the end screen anywhere between 5 and 20 seconds before the video ends. Where you start it inside that window matters more than most creators realize.
Why 15 to 20 Seconds Almost Always Beats 5 Seconds
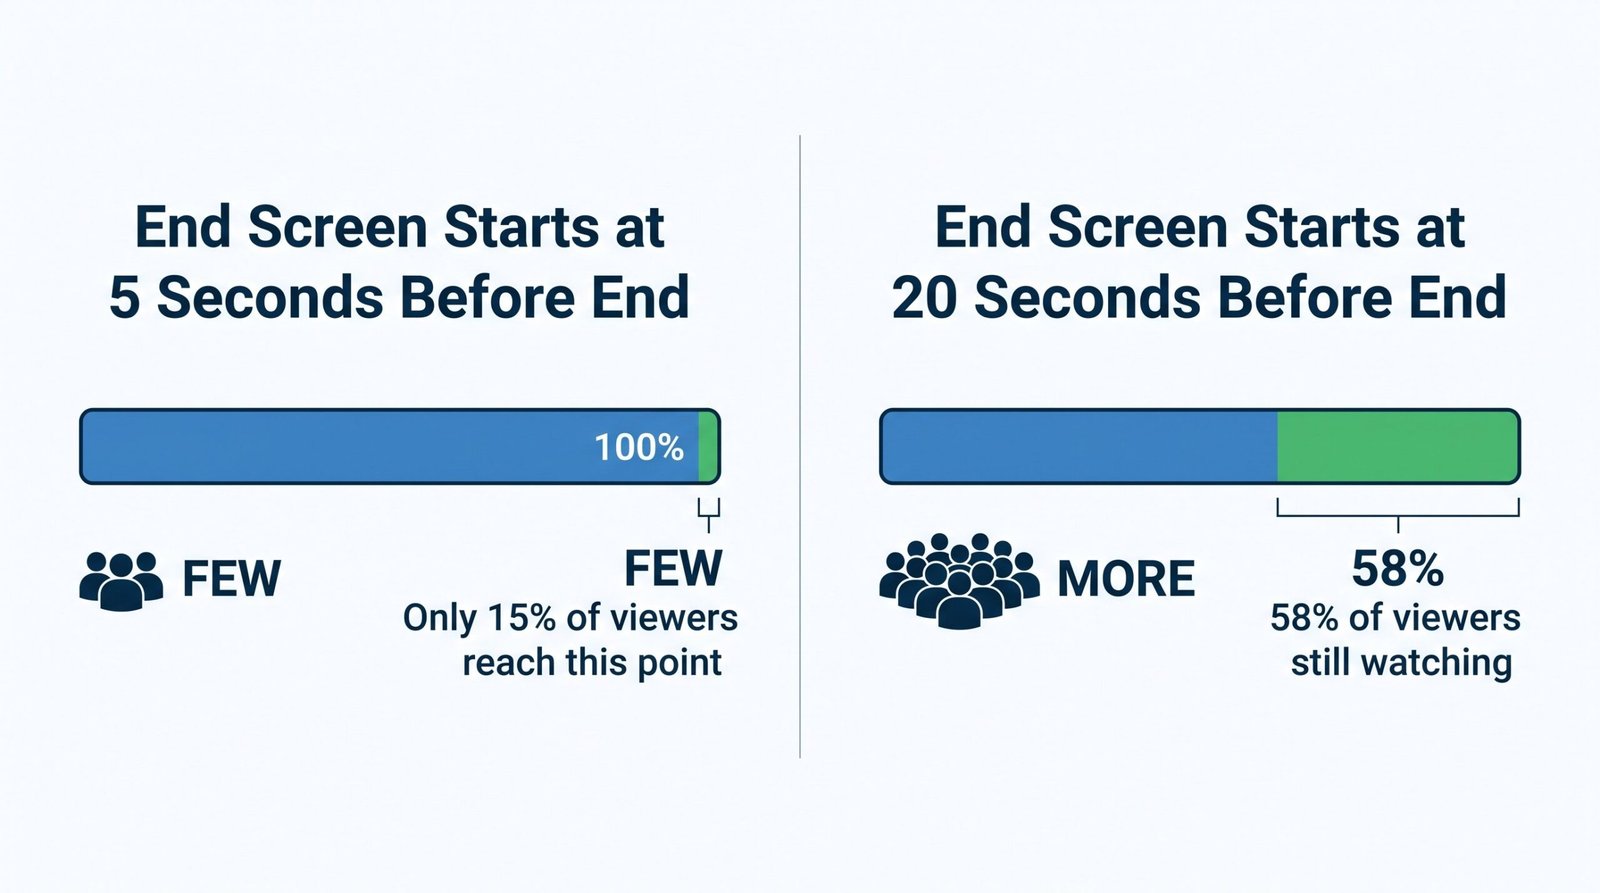
If you set your end screen to start at the 5-second mark, only viewers who watch through to the final 5 seconds will see it. That is a small group. Most videos lose a significant chunk of their audience in the last 10 to 20 seconds, often during outros, sign-offs, or anything that signals “the video is ending.” If your end screen starts at 5 seconds, you are showing it only to people who hung around for the goodbye.
Starting at 20 seconds catches everyone who would have watched to the 5-second mark, plus the larger group who exit between 20 and 5 seconds. You are capturing the viewers who decided to leave just before the formal ending. That is usually the biggest available audience for your end screen.
The Mobile Reality
Here is a mobile-specific point creators routinely miss. End screens only appear if the viewer watches up to the start point of the end screen. Viewers who scrub or exit before that point never see your end screen at all. On mobile, where short attention sessions and scroll behavior are common, this is a strong argument for starting the end screen as early as the 20-second mark.
If you start at 5 seconds and 40% of your viewers exited at the 10-second-before-end point, those viewers got nothing. No end screen impression, no click opportunity, no continued session.
Timing by Video Length
- Videos under 2 minutes: Start the end screen 15 seconds before the end. Twenty seconds eats too much of a short video and the end screen can start covering content that still has value.
- Videos 2 to 10 minutes: Start at 20 seconds before the end. This is the default sweet spot for most YouTube content.
- Videos over 10 minutes: Start at 20 seconds and consider whether your outro can be redesigned around the end screen. Long-form viewers are committed; you want maximum opportunity for them to keep watching.
One side note: end screens behave like YouTube chapters in that both depend on the viewer reaching that part of the video. The earlier you start, the more viewers see it. The difference is that chapters help viewers navigate during the watch; end screens help them choose what to watch next.
YouTube End Screen Templates: What Actually Matters
You will find a lot of guides pushing third-party end screen template tools. We are not going to do that. The reality is that what makes an end screen work has very little to do with the visual design and a lot to do with the layout choices.
The Three Working Layouts
Two-element layout: One video rectangle plus a subscribe button. This is the cleanest option and consistently produces the highest CTR per element. Use this when you want a single clear next click and a subscribe nudge.
Three-element layout: One video plus one playlist plus a subscribe button. Best for series-driven channels (tutorials, courses, sagas) where the playlist represents a binge path and the standalone video catches viewers who want something different.
Four-element layout: Only worth using on channels with multiple distinct content series or on videos featuring a collaboration where you want to promote both your work and another creator. Otherwise, the fourth element usually dilutes attention.
The Visual Principle
Leave enough of the video frame visible behind your end screen so the screen does not feel like a wall of thumbnails. Transparency in the layout matters because viewers are still processing the last seconds of your video, including any closing words or visual cue you give them. A four-thumbnail wall blocks the video itself.
For the background behind end screen elements, some creators use a looping ambient clip, others use a freeze-frame of the video’s final scene, and many use a custom outro graphic. None of these is significantly better than the others. Consistency across your channel matters more than executing any particular style. Pick one approach and use it on every video so your end screens become a recognizable signature.
The same logic that applies to thumbnail design applies here: legibility and clarity beat decoration. A simple end screen layout with one promoted video and one subscribe button will outperform an over-designed end screen almost every time.
The Verbal CTA Matters More Than the Visual
Here is the single biggest lever for end screen CTR that most creators ignore. In the 10 to 20 seconds before your end screen appears, deliver a brief verbal CTA. Something like “If you found this helpful, the video on the right walks through the next step” or “Hit subscribe and I’ll see you in the next one.”
Viewers who hear a specific CTA and see a corresponding visual element click at noticeably higher rates than viewers who only see the visual. Do not rely on the end screen graphic alone to do the work. The audio and visual together is what moves the click-through rate.
End Screens vs Cards: Which to Use When
YouTube has two related but different in-video promotion tools: end screens and Cards. Creators often pick the wrong one for the job.
| Feature | End Screen | YouTube Cards |
|---|---|---|
| When they appear | Last 5 to 20 seconds only | Any point during the video |
| What they promote | Videos, playlists, subscribe, channels, external links | Videos, playlists, channels, polls |
| Best use case | Suggest next video; grow subscribers | Mid-video CTAs, polls, link to relevant resources |
| Mobile support | Yes, when viewer reaches end screen | Yes |
| Max elements | 4 | Multiple cards |
The decision framework is simple. Use end screens for subscriber growth and next-video suggestions. Use Cards mid-video for in-context CTAs, like “I’ll link the full tutorial in a Card right now” or “Vote in the poll above.” Cards are designed to surface contextual information at the moment it becomes relevant. End screens are designed to keep the viewer on your channel after the video ends.
You can and usually should use both on the same video. A Card pointing to a related resource at the 3-minute mark, plus an end screen suggesting the next video, covers two completely different moments in the viewer’s session.
How to Check Your End Screen Performance
YouTube Studio gives you a dedicated end screen report. Most creators have never opened it. Here is where to find it and what to do with the data.
Where to Find the Report
Go to YouTube Studio > Analytics > Reach > End screens. You can also access per-video end screen analytics by opening a specific video’s analytics page and scrolling to the end screen section.
Key Metrics to Track
- Impressions: How many people reached the start point of your end screen and therefore saw it.
- Clicks: How many of those impressions resulted in a click on any end screen element.
- Click-through rate (CTR): Clicks divided by impressions. This is your headline metric.
- Element-level performance: CTR broken down by individual element, so you can see whether the subscribe button is outperforming the video element or vice versa.
Benchmarks
Most creators see 1% to 4% CTR per end screen element. Anything above 4% is strong. Anything below 1% means something is structurally off, often a combination of wrong promoted video, too many elements, or an end screen that starts too late in the video.
What Low CTR Usually Means
Low end screen CTR is almost always one of four things:
- Wrong promoted video: The video you are pushing is not a good match for the audience watching the parent video. Try switching to “Best for viewer” and see if CTR moves.
- Too many elements: If you are using four elements, drop to two. Element clutter divides attention.
- End screen starts too late: If you set the timing at 5 seconds, only the most committed viewers see it. Move the start to 15 or 20 seconds.
- No verbal CTA in the video: If you never tell the viewer what to do, they often will not figure it out from the visual alone.
Update Frequency
Check end screen performance every 30 days. If the CTR on a specific video’s end screen is declining, that is your signal to update the promoted video. This is the same maintenance rhythm you would apply to keyword research and other ongoing SEO tasks: small adjustments, made regularly, compound into significant gains over time.
For the official YouTube perspective on end screen mechanics and policy, you can reference YouTube’s official end screen documentation. And if you want to understand how Google indexes and ranks video content more broadly, Google’s video SEO guidelines are the authoritative source.
Frequently Asked Questions
How long can a YouTube end screen be?
A YouTube end screen can last between 5 and 20 seconds at the end of your video. You choose where in that window the end screen starts. The video itself must be at least 25 seconds long to support an end screen. Most creators get better results starting the end screen 15 to 20 seconds before the video ends because more viewers see it.
Can I add an end screen to a YouTube Short?
No. YouTube Shorts do not support end screens. Shorts are designed for fast vertical viewing and have their own engagement signals separate from long-form videos. If you want to drive viewers from a Short to another video, use a verbal CTA and pin a comment with a link, or pin the next Short in your Shorts feed.
Why aren’t my end screens showing up?
The most common reasons end screens do not appear are: the video is shorter than 25 seconds, the video is set as “Made for Kids” which disables end screens, the viewer exited before reaching the end screen start point, or the end screen was saved but did not publish. Re-open the video in Studio and confirm the end screen is set and saved.
Do end screens show on mobile?
Yes. End screens work on the YouTube mobile app, smart TVs, game consoles, and desktop. The one condition is that the viewer must watch up to the start point of the end screen. Mobile viewers who scrub past or exit before that point will not see the end screen at all, which is why starting the end screen earlier in the window often produces more impressions.
Can I promote someone else’s video on my end screen?
You can promote another creator’s channel using the Channel element, but you cannot directly promote a specific video from another channel using the Video element. The Video element is restricted to your own uploads. For collaborations, the standard workflow is to use the Channel element to send viewers to your collaborator’s channel page.
How many end screen elements can I have?
You can add up to four end screen elements per video. One of those elements should almost always be a Subscribe button. The other three slots can be a mix of Video, Playlist, Channel, and Link elements. Most creators get better per-element CTR with two or three elements rather than maxing out at four, because element clutter divides viewer attention.
Should I use “Best for viewer” or “Newest upload”?
“Best for viewer” usually outperforms “Newest upload” for channels with diverse content because YouTube selects the video each individual viewer is most likely to watch and complete. Completed views generate session time, which is a channel ranking signal. “Newest upload” works better only on channels where every video is relevant to every subscriber, which is rare.
Can I add an end screen after a video is published?
Yes. You can add or edit an end screen on any published video at any time without affecting the video’s URL, view count, or upload date. Open the video in YouTube Studio, click End screen in the editor, set your elements, and save. The end screen will apply to all future views of that video immediately.